

Creating artificial rocks for waterfalls is a project that can add a touch of nature-inspired beauty to garden landscapes, theme parks, or even inside homes. This DIY venture not only allows for a customized design that fits your spatial requirements and aesthetic preferences but also offers a cost-effective alternative to natural boulders.
With a combination of materials such as concrete, fiberglass, or foam and the right techniques, you can craft stunning, lifelike rocks that serve as the centerpiece for serene and picturesque artificial waterfalls. Let’s embark on the journey of fashioning these faux stones that promise to transform your desired space into a tranquil oasis. In this blogpost on how to make artificial rocks for waterfalls, we will take you through the process step by step and provide useful tips along the way.
What is Artificial Rock?
Artificial rocks are man-made creations that mimic the appearance of natural stones. They can be used for various purposes, such as landscaping and home decor, but their most popular application is in building artificial waterfalls. These faux boulders have a lightweight yet sturdy structure and are designed to blend seamlessly into their surroundings. You can use them to construct structures like cascading fountains, pondless waterfalls, or streambeds. It’s a versatile material that caters to your creativity and imagination.
Benefits of Making Artificial Rocks for Waterfalls
There are many benefits to making your own artificial rocks for waterfalls, including:
Customization:
You have full control over the size, shape, and color of the rocks, allowing you to create a unique design that suits your specific needs and preferences.
Cost-effective:
Natural rocks can be expensive, especially if you need a large quantity for your project. Making artificial rocks is a more budget-friendly option that still provides the same aesthetic appeal.
Lightweight:
Artificial rocks are significantly lighter than their natural counterparts, making them easier to transport and work with during installation.
Versatile:
With the ability to mold and shape the rocks, you can create a variety of different sizes and textures, giving you the flexibility to design a waterfall that fits your space perfectly.
Durable:
When made correctly with quality materials, artificial rocks are durable and long-lasting, making them a wise investment for any outdoor project.
Planning and Designing Your Waterfall
Before you begin the construction process, it’s essential to have a plan and design in place. Here are some things to consider:
Location:

Choose the location for your waterfall carefully, ensuring that there is enough space for both the structure itself and the surrounding landscape. Take into account factors such as lighting, access to power, and any potential obstacles.
Size:
Decide on the size of your waterfall based on the available space and the amount of water you want to flow through it. Consider using a garden hose or rope to help visualize the structure’s dimensions before starting.
Design:
Sketch out your desired design on paper or use 3D modeling software to get a better idea of how the finished product will look. This will also help you determine how many rocks and what shapes and sizes you need to create.
What You Will Need
To start off, let’s gather the necessary materials and tools. For this project, you will need:
Concrete Mix (Preferably With Small Pebbles for a More Realistic Texture)
Concrete mix serves as the base material for creating artificial rocks. The small pebbles in the mix lend a rough and textured appearance to the rocks, mimicking real boulders found in nature.
Fiberglass Mat
Fiberglass matting is used to reinforce the structure of the rocks and provide added strength and durability. It also helps in shaping the foam or concrete into the desired form.

Foam Insulation or Polystyrene Blocks
Foam insulation or polystyrene blocks are used to create a lightweight base structure for large rocks. They can be easily cut and shaped, making them ideal for creating intricate designs.
Chicken Wire or Mesh
Chicken wire or mesh is used to provide support and shape to the foam or concrete. It also helps in anchoring the rocks to the ground or structure.
Scissors, Utility Knife, and Wire Cutters
These tools will come in handy for cutting materials such as fiberglass matting, foam insulation, and chicken wire.
Protective Gear
Since this project involves working with concrete mix and other materials that can be hazardous if not handled properly, it is important to use protective gear such as gloves, goggles, and a dust mask.
11 Step-by-step Guidelines on How to Make Artificial Rocks for Waterfalls
Step 1: Prepare Your Work Area
Choose a flat and stable surface to work on, preferably outdoors or in a well-ventilated area. Cover the area with plastic sheeting to protect it from any spills or mess. You may also want to wear old clothes as the process can get messy. It’s also a good idea to have a water source nearby for easy clean-up. The use of a tarp or plastic sheeting also makes for easy cleanup. But do be aware that working with concrete can be messy and potentially damaging to your clothes.
Step 2: Shape the Base Structure

If you are using foam insulation or polystyrene blocks, use a utility knife to cut and shape them into the desired size and shape of your rock. You can use sandpaper to smooth out any rough edges. It’s best to start with a large base and gradually shape it down to the desired size. This will give you more control over the final size and shape of your rock. You can also stack multiple layers of foam or polystyrene to create a more realistic-looking rock. It’s important to keep the edges rough and uneven for a natural appearance.
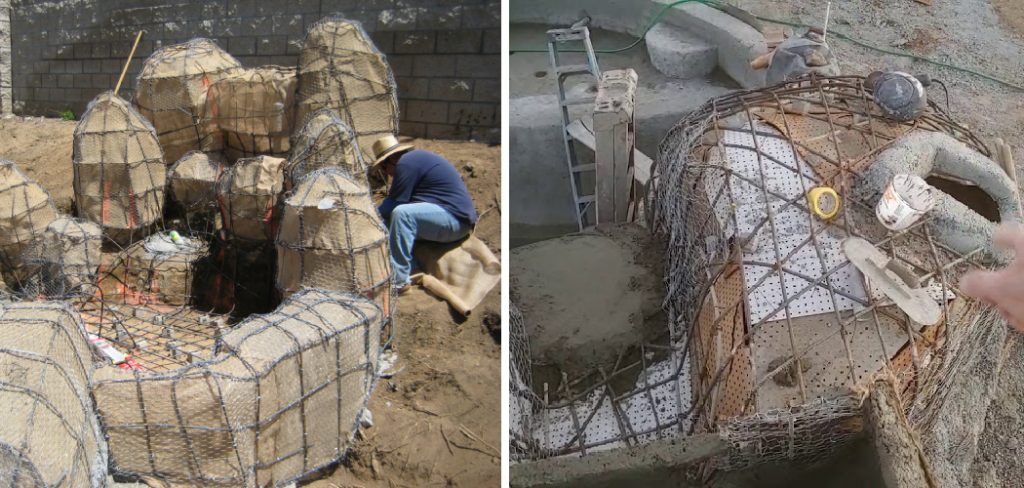
Step 3: Add Chicken Wire or Mesh
Wrap chicken wire or mesh around the foam base, securing it with zip ties. This will provide support and shape to the foam while also aiding in anchoring the rock to the ground or other structures. You can also add more layers of chicken wire or mesh for added strength and texture. It’s essential to be careful and avoid crushing the foam while working with the wire or mesh. This can alter the shape and ruin the natural appearance of your rock. It’s also a good idea to wear gloves while handling the wire or mesh to avoid getting cut.
Step 4: Mix and Apply Concrete or Mortar
Following the instructions on your concrete or mortar mix, mix it with water and apply a layer of about 1-2 inches onto the chicken wire or mesh. Use your hands or tools to shape and mold it into the desired shape and texture of your rock. You can also add small pebbles or other materials to give a more realistic appearance. It’s helpful to have a reference photo or sketch of your desired design on hand as you work. You can also use a spray bottle filled with water to keep the concrete or mortar moist and easier to shape. But do not make it too wet, as this can weaken the structure.
Step 5: Add Fiberglass Resin (Optional)
If you want to add extra strength and durability to your rocks, you can apply a layer of fiberglass resin on top of the wet concrete or mortar. This will also help shape and smooth out any rough edges. Although optional, this step is recommended for larger rocks or structures that will need to withstand more weight and pressure. You can also add the fiberglass matting directly into the concrete mix for added reinforcement. The resin and matting will dry quickly, so it’s best to work swiftly.
Step 6: Texture and Shape the Rock

Using various tools such as a trowel, putty knife, or old brushes, you can add texture and shape to your rock. You can create crevices, cracks, and rough edges to mimic natural rocks found in nature. Use reference photos or sketches to guide you. It’s also helpful to take breaks and step back to see if your progress matches your desired design. If not, you can always add more or remove some concrete to achieve the desired look. You can also use sandpaper or a wire brush to add more texture and details.
Step 7: Let It Cure
Allow your rock to dry and cure for at least 24 hours. You can cover it with plastic to prevent it from drying too quickly and cracking. If the weather is hot or dry, you may need to mist the rock with water periodically to keep it moist during the curing process. The longer you let it cure, the stronger and more durable your rock will be. You can also speed up the curing process by using a heat lamp or hairdryer on low heat. It’s essential to follow the instructions on your concrete or mortar mix for the best results.
Step 8: Paint or Stain (Optional)
Once your rock is completely dry, you can paint or stain it to add color and depth. Acrylic paints or exterior house paint work well for this project. You can also use a concrete stain for a more natural look. It’s best to apply multiple layers of paint or stain, allowing each layer to dry before adding the next one. This will give your rock a more realistic and layered appearance. You can also add different shades of color to create depth and shadows for a more natural look. It’s best to use a variety of brushes for a more realistic texture.
Step 9: Install in Your Waterfall
Once your rock is completely dry and painted, you can install it in your waterfall. Depending on the size and weight of your rock, you may need assistance or equipment to move and place it properly. You can also use concrete or mortar to secure it to other rocks or structures for added stability. It’s important to make sure that the rock is firmly in place and not in danger of shifting or falling. You can also add other decorative elements such as plants or lighting to enhance the overall look of your waterfall.

Step 10: Add Finishing Touches
Once your rock is in place, you can add any finishing touches you desire. This can include adding moss or other natural elements to give a more realistic appearance. You can also add small details such as cracks and crevices with paint or texture to make it look even more natural. It’s essential to take a step back and assess your work before adding any final touches to ensure that it meets your desired design. Congratulations, you now have a beautiful and natural-looking rock as the centerpiece of your waterfall!
Step 11: Enjoy Your Beautiful Artificial Waterfall!
Now that your waterfall is complete, you can sit back and enjoy its beauty. You can even add a timer or remote control to turn the water on and off for added convenience. With proper maintenance, your artificial rock should last for years to come. You can also use these techniques to create other natural-looking elements in your garden or landscaping. Have fun experimenting with different shapes, sizes, and designs to create your perfect outdoor oasis.
Following these steps on how to make artificial rocks for waterfalls and using your creativity, you can easily create a stunning artificial waterfall that looks like it came straight from nature. Not only is this DIY project cost-effective, but it also allows you to customize and design the perfect addition to your outdoor space. So gather your materials and get ready to be amazed by your very own beautiful artificial waterfall! Happy crafting!
How Much Will It Cost?
The cost of creating an artificial rock waterfall will vary depending on the size and materials used. However, it is generally more affordable than purchasing a pre-made artificial rock or hiring a professional to create one for you. On average, the cost can range from $200-$500 for a small to medium-sized waterfall. For larger and more complex designs, the cost may increase up to $1000 or more. However, keep in mind that the cost will also depend on your budget and the quality of materials you choose to use.
Regardless, creating an artificial rock waterfall is a cost-effective way to enhance the beauty of your outdoor space. So don’t let budget constraints stop you from embarking on this fun and creative DIY project! With some time and effort, you can have a stunning waterfall that will bring joy and tranquility to your outdoor space for years to come.
Tips and Tricks

- Always Take Safety Precautions When Working With Concrete, Mortar, and Other Materials. Wear Protective Gear Such as Gloves and Goggles to Avoid Any Accidents.
- It’s Helpful to Have a Reference Photo or Sketch of Your Desired Design on Hand as You Work.
- Use Various Tools Such as Trowels, Putty Knives, Wire Brushes, and Sandpaper to Add Texture and Shape to Your Rock.
- Take Breaks and Step Back to Assess Your Progress and Make Sure It Matches Your Desired Design.
- Consider Adding Fiberglass Resin for Added Strength and Durability, Especially for Larger Rocks or Structures.
- Allow Your Rock to Cure for at Least 24 Hours Before Painting or Staining.
- Use a Variety of Brushes and Multiple Layers of Paint or Stain to Add Depth and a More Realistic Appearance.
- Have Fun and Be Creative With Your Finishing Touches to Make Your Artificial Rock Truly Unique!
- Regularly Clean and Maintain Your Waterfall to Keep It Looking Beautiful for Years to Come. Enjoy the Tranquility and Beauty of Your Very Own Artificial Waterfall! Enjoy the Tranquility and Beauty of Your Very Own Artificial Waterfall!

Frequently Asked Questions
Q: Can I Make Different Sizes and Shapes of Rocks?
A: Absolutely! Use Your Creativity to Design Any Shape or Size You Desire. You Can Also Use Different Molds or Forms to Create a Variety of Rocks.
Q: Is This Project Suitable for Beginners?
A: Yes, This Project is Beginner-Friendly and Easily Customizable to Your Skill Level. Just Be Sure to Follow Proper Safety Precautions and Instructions for the Best Results.
Q: How Long Will It Take to Create an Artificial Waterfall?
A: The Time Needed Depends on the Size, Complexity, and Number of Rocks You Want to Make. Generally, It Can Take a Few Hours to a Couple of Days From Start to Finish.
Q: Can I Make an Artificial Waterfall Indoors?
A: While It’s Possible, Keep in Mind That Waterfalls Can Be Messy and May Require Additional Waterproofing Measures. It’s Best to Create Your Waterfall Outdoors for Easier Maintenance and Cleanup. However, You Can Use These Techniques to Create Other Indoor Decorations Such as Faux Rocks or Brick Walls.
Conclusion
In bringing the art of making artificial rocks for waterfalls to a close, remember that this creative endeavor not only enhances the beauty of any space but also reflects the power of human ingenuity in replicating the majesty of nature. The process requires patience, attention to detail, and a willingness to experiment. Whether you’re an experienced DIY enthusiast or a beginner, the satisfaction of building your own stunning waterfall feature with these handcrafted rocks is immense.
As you admire the calming sounds of water cascading over your work, take pride in knowing you’ve crafted a unique piece of art that can be enjoyed for years to come. Thanks for reading this article on how to make artificial rocks for waterfalls.
Toby Rede is a professional potter focused on creating functional and artistic ceramics. His work blends natural textures with modern forms, often inspired by sustainable gardening and outdoor environments. Toby’s pottery emphasizes both utility and beauty, reflecting his philosophy of intentional craftsmanship. On the blog, he shares insights on integrating handmade objects into everyday life.
Education
Associate Degree in Ceramic Technology, Alfred University
Professional Focus
Pottery creation with a focus on functionality and artistic expression
Techniques exploring texture, glazing, and sustainable materials
Professional Accomplishments
Work featured in regional art shows and garden exhibitions
Collaborations with local craft fairs and home decor shops