

If you’re new to the art of pottery, you may have come across the use of a cone in firing your creations. A cone is a small, triangular-shaped object made of ceramic materials that is inserted into the kiln during firing. It’s used as a guide to determine when a specific temperature has been reached inside the kiln.
Using a cone in pottery can seem confusing at first, but with some guidance and practice, it can become an essential tool in your firing process. In this guide, we’ll walk you through everything you need to know about how to use a cone on pottery and how it can benefit your creations.
What is a Cone?
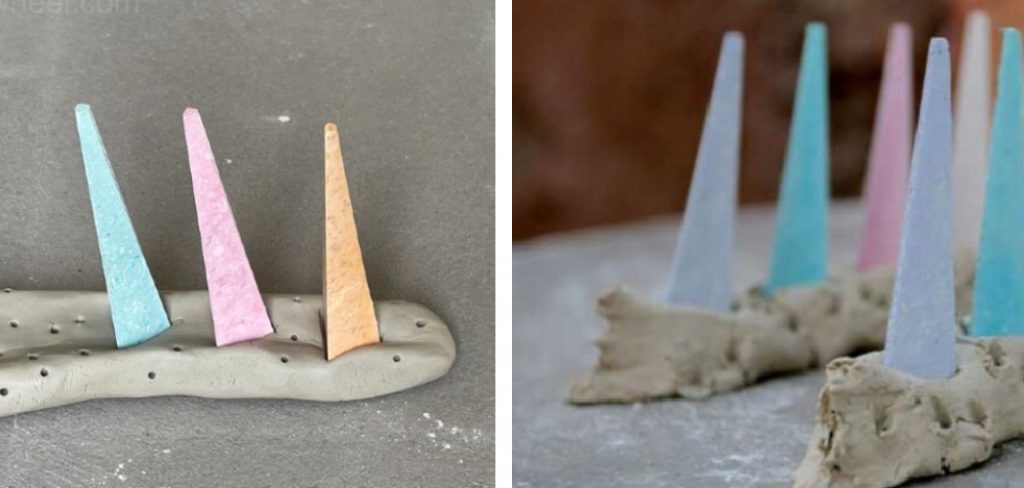
A cone is a small pyramid-shaped object that is made of ceramic materials such as clay, feldspar, quartz, and limestone. They are designed to bend and melt at specific temperatures, allowing potters to determine when their desired temperature is reached inside the kiln.
There are different types of cones available on the market, but the most commonly used in pottery are Orton cones, which come in a range of numbers that correspond to different temperatures. For example, cone 06 will bend and melt at a lower temperature than cone 10.
11 Best Ways on How to Use a Cone on Pottery
1. Choosing the Right Cone for Your Pottery:
The first step in using a cone on pottery is choosing the right one for your specific needs. As mentioned, cones come in different numbers that correspond to different temperatures. It’s essential to know what temperature you want to reach in your firing process and choose the appropriate cone accordingly. If you’re unsure, it’s always best to consult with a more experienced potter or refer to your kiln’s manual.
2. Preparing Your Cone for Firing:
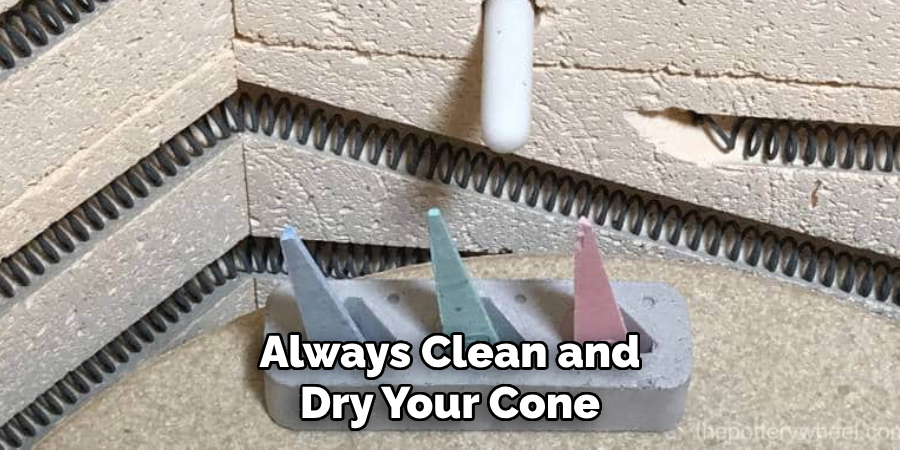
Before inserting the cone into the kiln, make sure it is clean and free of any dust or debris that may affect its bending and melting properties. You can use a soft cloth to wipe away any dirt or residue.
Preparing your cones properly is crucial as any impurities can alter their behavior during firing. If you notice any cracks or chips on the cone, it’s best to replace it with a new one.
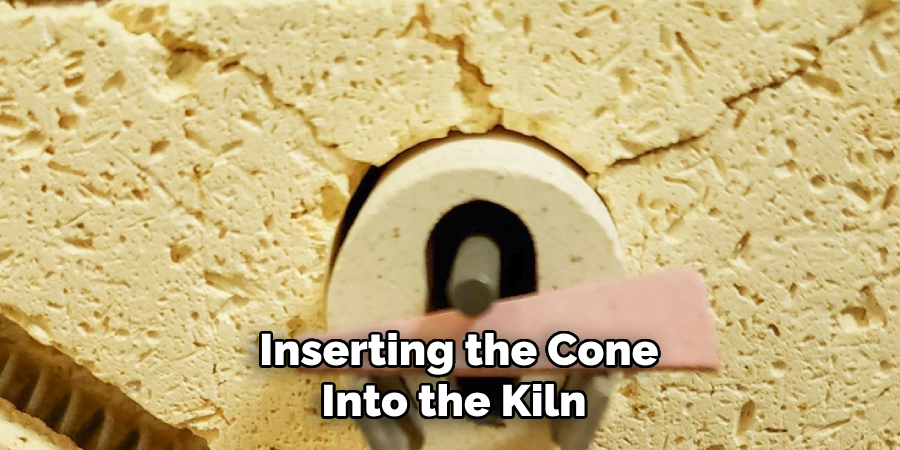
3. Placement of the Cone in the Kiln:
The placement of your cone inside the kiln is crucial for accurate readings. It should be placed at eye level and near the middle of your pottery pieces. Avoid placing it too close to the heating elements as this can cause it to bend and melt prematurely.
This can also affect the overall temperature inside the kiln. If you’re firing multiple pieces, make sure to place a cone near each one for accurate temperature readings.
4. Soaking Time:
Soaking time refers to the amount of time your kiln stays at a specific temperature before cooling down. This is important as it allows your pottery to mature and reach its full strength. Make sure to follow the recommended soaking time for the cone you’re using to achieve the best results. If you’re unsure, consult with a more experienced potter or refer to your kiln’s manual.
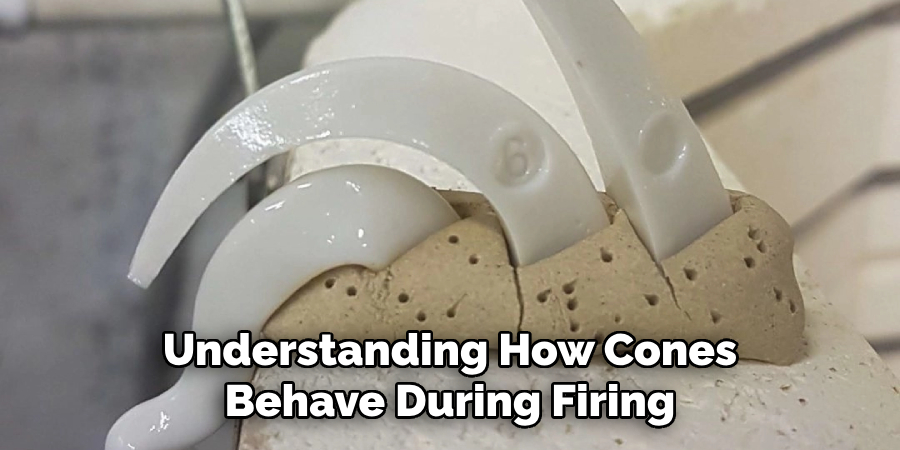
5. Monitoring the Cone:
As the temperature inside the kiln increases, keep an eye on the cone for any signs of bending or melting. This can happen suddenly and is an indication that your desired temperature has been reached.
Keep in mind that different cones have different melting points, so it’s crucial to use the right one for your firing process. If you notice the cone bending and melting, it’s time to start cooling down your kiln.
6. Cooling Down the Kiln:
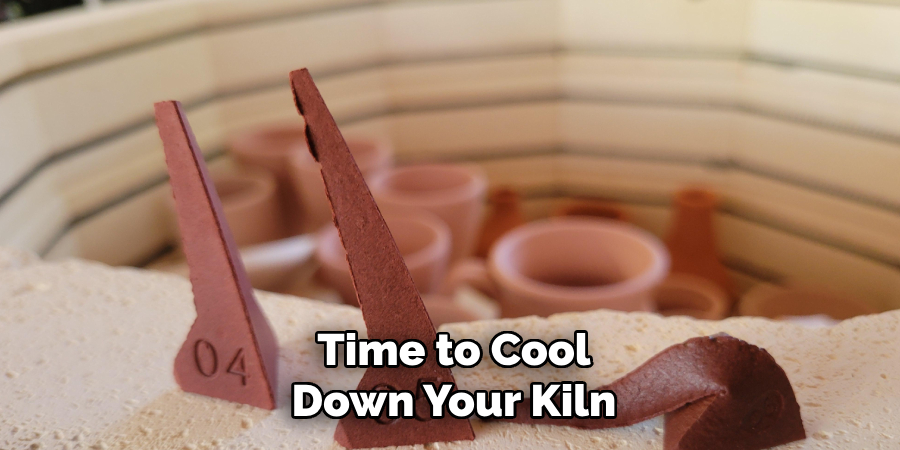
After the cone has bent and melted, it’s time to cool down your kiln. This can take several hours, depending on the type of clay used and the temperature reached during firing. It’s essential to allow your pottery to cool down slowly to prevent cracking or breaking. Opening the kiln too soon can also cause thermal shock and ruin your creations. Make sure to follow the recommended cooling down time for your specific pottery pieces.
7. Checking Your Pottery:
Once the kiln has cooled down, it’s time to check on your pottery. Carefully remove the cones and open the kiln door. You should see beautifully glazed and fired pieces of pottery ready to be admired and used. If you notice any issues such as cracks or uneven firing, take note of them and make adjustments for your next firing process.
8. Keep a Record:
It’s always a good idea to keep a record of the cone used, the temperature reached, and any observations during the firing process. This will help you track your progress and make any necessary changes for future firings. You can also use this record to troubleshoot any issues that may arise. This is especially helpful for beginners who are still learning the ins and outs of pottery firing.
9. Experiment with Different Cones:
As you gain more experience in pottery, don’t be afraid to experiment with different cones and temperatures. This will help you understand how different combinations affect your pottery and allow you to create unique pieces. Keep track of your experiments in your record book and use it as a reference for future projects.
10. Understanding Cone Behavior:
It’s crucial to have a basic understanding of how cones behave during firing. For example, cone 04 will bend and melt faster than cone 06 due to its different melting points. This knowledge will help you determine the appropriate soaking time for your pottery pieces and achieve consistent results. If you’re unsure, don’t hesitate to ask for advice from more experienced potters.
11. Practice, Practice, Practice:
Using a cone on pottery may seem intimidating at first, but with practice and patience, it will become second nature to you. Keep experimenting and learning as much as you can about the firing process. With time, you’ll become more confident and comfortable using cones, and your pottery will continue to improve. Remember, practice makes perfect!
Following these tips and techniques on how to use a cone on pottery will help you achieve consistent firing results and create beautiful pieces of art. Don’t be afraid to try new things and experiment with different cones and temperatures. Keep learning and perfecting your skills, and your pottery journey will be a rewarding one. Happy potting!
Additional Tips and Tricks to Use a Cone on Pottery
- If you want to create a textured surface on your pottery, try using a cone with a different shape or texture. For example, instead of using a regular cone, you can use a spiral-shaped cone or one with ridges for an interesting effect.
- Experiment with different sizes and shapes of cones to create unique patterns and designs on your pottery. You can also combine multiple cones for a more complex design.
- If you want to add color to your pottery using a cone, make sure to use underglazes or glazes specifically designed for this purpose. Regular paints or dyes may not work well and could potentially damage your final piece.
- When using a cone on wet clay, be careful not to press too hard or deep, as this can cause the clay to crack or distort. Use a light touch and gently roll the cone over the surface for best results.
- To create crisp lines and edges with your cone, use a steady hand and maintain consistent pressure while drawing on the surface of your pottery. Practice makes perfect, so don’t be afraid to experiment and try different techniques.
- Don’t limit yourself to just using a cone for patterns and designs. You can also use it to create texture on the outside of your pottery, adding depth and interest to your piece.
- For advanced pottery techniques, try using a cone with slip (liquid clay) instead of dry clay. This allows you to manipulate the material more easily and create intricate designs.
- Remember to always clean and dry your cone after use to prevent any buildup of clay or glaze residue. This will help prolong the life of your cone and ensure clean, crisp lines in your designs.
- When using a cone on curved surfaces such as bowls or vases, try rotating the piece while drawing with the cone for a more even and consistent pattern.
- Finally, don’t be afraid to make mistakes, and have fun using a cone on pottery. With practice and patience, you can create beautiful and unique pieces that showcase your creativity and skill.
Following these tips and tricks can help you take your pottery skills to the next level with the use of a cone. Remember to always be open to new techniques and ideas, and never be afraid to push yourself out of your comfort zone. Happy potting!
Things You Should Consider to Use a Cone on Pottery
1. The first thing you should consider when using a cone on pottery is to have a clear idea of what type of cone you need. There are different types of cones available, with varying temperature ranges and materials used. Some common types include Orton cones, self-supporting cones, and witness cones. It’s important to choose the right type for your specific needs.
2. Another factor to keep in mind is the cone’s temperature rating. Cones are designed to bend or melt at specific temperatures, indicating that the desired temperature has been reached in the kiln. It’s essential to choose a cone with a temperature range appropriate for the type of clay and glaze you are using.
3. The placement of the cone in the kiln is also crucial for accurate temperature readings. Typically, cones are placed on the kiln shelf next to the pieces being fired. However, if you have a large kiln or multiple shelves, it’s necessary to place cones in different locations for more accurate temperature readings.
4. It’s recommended to use at least three cones of the same type and rating in different areas of the kiln. This will provide a more accurate reading of the temperature throughout the kiln, as some areas may have hot or cold spots. It’s also important to note that cones can be affected by drafty areas or airflow, so it’s necessary to place them in consistent positions for each firing.
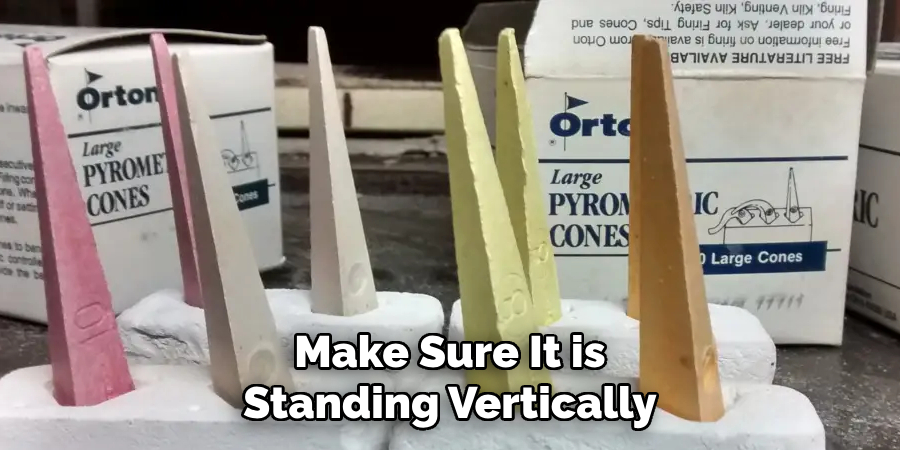
5. When placing the cone on the shelf, make sure it is standing vertically and not leaning against any other objects. This will ensure that the cone can bend and melt properly, indicating the correct temperature.
6. You should also consider using a cone plaque or holder to help keep the cones standing straight and make it easier to read their bending or melting point. These tools are especially helpful when firing multiple pieces with different glazes and temperatures in one kiln.
7. It’s crucial to monitor the cones throughout the firing process and make any necessary adjustments. If a cone is not bending or melting at the desired temperature, it’s an indication that something may be wrong with the kiln or firing schedule. It’s essential to address these issues to ensure successful firings.
8. After each firing, make sure to record the cone readings for future reference. This will help you determine any changes that may need to be made to your firing process. It’s also helpful to keep a log of the type and brand of cones used, as well as the temperature range, for consistent results.
Following these considerations when using cones on pottery will help ensure accurate temperature readings and successful firings. It’s important to be diligent in monitoring the cones and making any necessary adjustments for optimal results.
And remember, always follow manufacturer recommendations for specific cone usage and safety precautions. Happy potting!
Troubleshooting Common Issues of Using a Cone on Pottery
1. Uneven Firing:
One of the main issues that potters face when using cones is uneven firing. This occurs when parts of the pottery object are not heated at the same temperature as others, resulting in uneven glazing or even cracking of the object.
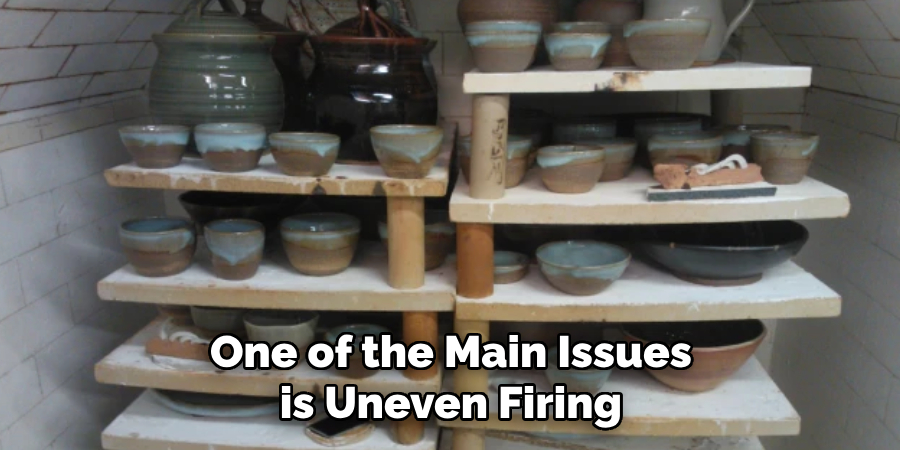
To troubleshoot this issue, it is important to ensure that the kiln is properly loaded with enough space between each piece. This allows for proper heat circulation and prevents hot spots from forming. Additionally, make sure that the cone placements are accurate and consistent throughout the kiln. If there are any discrepancies, adjust the location of the cones accordingly.
2. Improper Cone Placement:
Another common issue is the improper placement of the cones within the kiln. This can lead to inaccurate temperature readings and ultimately affect the firing process.
To avoid this problem, it is crucial to carefully follow the manufacturer’s instructions for cone placement in your specific kiln model. Additionally, regularly checking and calibrating the kiln’s temperature gauge can help ensure accurate readings and prevent any mishaps during firing.
3. Under or Overfiring:
Under or overfiring occurs when the kiln does not reach the desired temperature, resulting in either undercooked or overcooked pottery pieces. This can be caused by a variety of factors such as incorrect cone placement, malfunctioning kiln parts, or human error.
To troubleshoot this issue, check the kiln’s temperature gauge and make sure it is properly calibrated. If not, adjust it accordingly. Additionally, double-check the cone placements and make any necessary adjustments. It is also helpful to regularly check and maintain the kiln’s heating elements to ensure they are functioning properly.
4. Cracking or Warping:
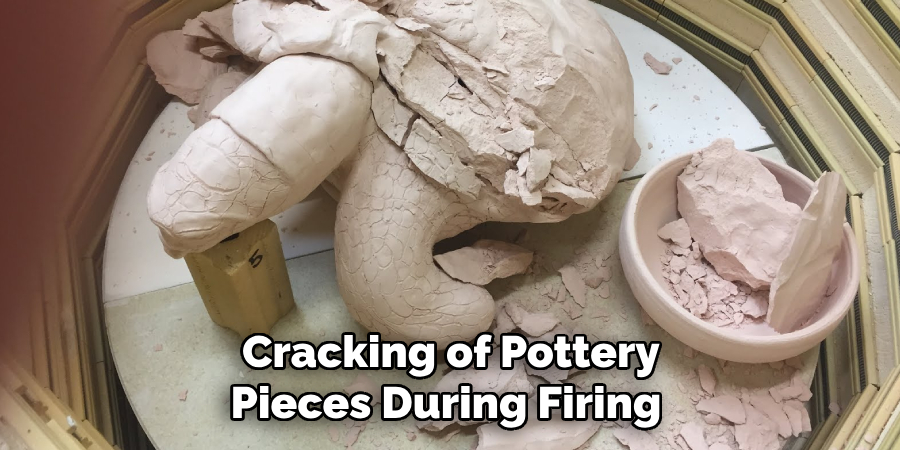
Cracking or warping of pottery pieces during firing can be a frustrating issue for potters. This can be caused by various factors such as improper drying before firing, uneven glazing, or incorrect placement of the cones.
To prevent this problem from occurring, make sure to properly dry your pottery before firing and carefully apply the glaze evenly throughout the piece. It is also important to carefully place cones in the kiln to ensure even heating of the object.
Following these troubleshooting tips can help potters avoid common issues when using cones for firing their pottery pieces. It is also important to regularly maintain and calibrate your kiln to ensure optimal performance and prevent any mishaps during the firing process.
Remember, practice makes perfect, and with time, you will become more familiar with the firing process and be able to troubleshoot any issue that may arise. Happy potting!
Frequently Asked Questions
What is the Purpose of Using a Cone in Pottery?
The cone acts as a temperature indicator during the firing process. It helps potters determine when their kiln has reached the desired temperature for proper firing. As the cone heats up, it will begin to bend or melt, indicating that the kiln has reached the desired temperature.
How Many Cones Should I Use in My Kiln?
The number of cones needed depends on the size and type of your kiln. Generally, for small electric kilns, one cone at the center is sufficient. For larger gas or wood-fired kilns, multiple cones may be necessary to ensure even heating throughout the space.
Can I Reuse Cones?
No, cones are designed for single use only. Once they have been fired, they will no longer accurately indicate temperature and should be disposed of.
Is There a Difference Between Different Types of Cones?
Yes, there are several different types of cones available, including self-supporting and witness cones. Self-supporting cones do not require a holder and can be placed directly on the kiln shelf, while witness cones are used alongside self-supporting cones to provide additional temperature readings throughout the kiln.
Conclusion
All in all, knowing how to use a cone on pottery is crucial for achieving successful and consistent firings. By understanding common issues that may arise when using cones, potters can troubleshoot and prevent mishaps during the firing process.
Remember to regularly check and maintain your kiln, follow the manufacturer’s instructions, and practice proper drying techniques to ensure optimal results. Happy potting!
Toby Rede is a professional potter focused on creating functional and artistic ceramics. His work blends natural textures with modern forms, often inspired by sustainable gardening and outdoor environments. Toby’s pottery emphasizes both utility and beauty, reflecting his philosophy of intentional craftsmanship. On the blog, he shares insights on integrating handmade objects into everyday life.
Education
Associate Degree in Ceramic Technology, Alfred University
Professional Focus
Pottery creation with a focus on functionality and artistic expression
Techniques exploring texture, glazing, and sustainable materials
Professional Accomplishments
Work featured in regional art shows and garden exhibitions
Collaborations with local craft fairs and home decor shops