

Terracotta clay is a natural, reddish-brown material that has been cherished for centuries due to its durability, aesthetics, and versatility. Widely used for pottery, crafts, and various home projects, terracotta clay offers a unique charm that complements both traditional and modern designs. One of the greatest benefits of working with terracotta clay is its accessibility—it is easy to mold, air-dries effectively, or can be kiln-fired for added strength. This eco-friendly material is perfect for creating anything from home decor and gardening accessories to functional items like plates or bowls.
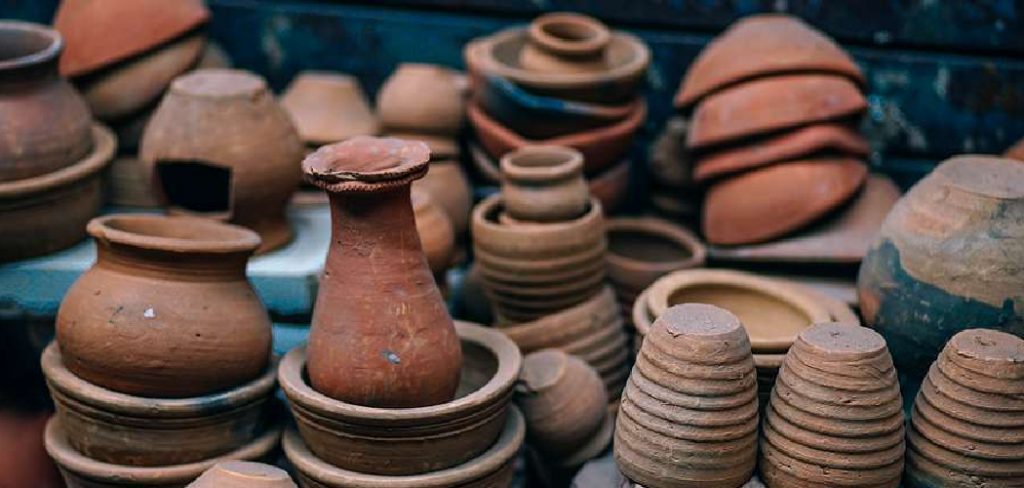
This article serves as a practical guide on how to use terracotta clay at home, providing step-by-step instructions on preparation, crafting techniques, drying methods, and finishing touches to ensure a successful and satisfying project. Whether you’re aiming to create decorative pieces or useful household items, terracotta clay opens the door to endless possibilities.
Choosing the Right Terracotta Clay
When starting a project with terracotta clay, selecting the appropriate type of clay is crucial. Different varieties cater to specific needs and skill levels.
Types of Terracotta Clay
- Air-dry clay: This type does not require firing in a kiln, making it ideal for beginner projects or when access to specialized equipment is limited. It dries naturally at room temperature.
- Kiln-fired clay: Known for its durability, this clay requires baking at high temperatures in a kiln, resulting in sturdy, long-lasting creations. It’s perfect for functional items like bowls or planters.
- Polymer terracotta-colored clay: A synthetic option, this clay is versatile for small crafts and hardens when baked in a standard home oven. It mimics the appearance of terracotta without needing traditional processes.
Where to Buy Terracotta Clay
Terracotta clay is widely available in craft stores, online marketplaces, and specialty pottery supply shops. Researching your preferred type before purchasing can save time and ensure a smooth crafting process.
Storage Tips
To keep your terracotta clay workable, store it in an airtight container to prevent premature drying. For added protection, place a damp cloth inside the storage bag to maintain proper moisture levels, ensuring the clay stays pliable for future use.
Tools and Materials Needed
Basic Tools
- Rolling pin: Essential for flattening clay and creating even surfaces.
- Clay carving tools: Specialized tools or everyday items like forks, knives, and toothpicks can be used for shaping and adding detail.
- Sponge and water: Ideal for smoothing surfaces and keeping the clay moist as you work.
Optional Tools for Advanced Work
- Clay extruder: Perfect for shaping precise coils or intricate designs.
- Stamps: Useful for adding decorative textures to your clay projects.
- Wire cutter: Handy for slicing large portions of clay with precision.
Additional Materials
- Paints and sealants: Bring finished pieces to life with vibrant colors and protective finishes.
- Sandpaper: Smooth out imperfections and refine the surface of dried clay.
Ensuring you have the right tools and materials makes the crafting process smoother and allows for greater creativity and flexibility in your designs. Whether you’re a beginner or an experienced artisan, these essentials will help bring your terracotta creations to fruition.
Preparing the Clay
Proper clay preparation is essential to ensure your terracotta creations are durable, smooth, and easy to work with. Following a few straightforward steps, you can achieve the perfect consistency and avoid common issues like cracking or uneven textures.
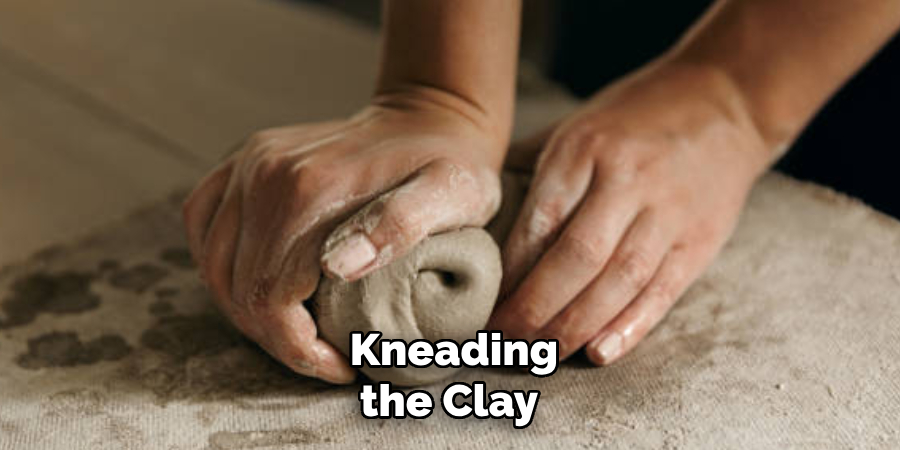
Step 1: Kneading the Clay
Work the clay with your hands to remove any trapped air bubbles. This process, known as kneading or wedging, also helps improve the flexibility and uniformity of the clay. Take your time with this step to ensure the clay is ready for crafting.
Step 2: Adding Moisture (If Needed)
Add a few drops of water if the clay feels too dry or crumbly. Gradually knead the clay, incorporating the moisture evenly. Avoid over-wetting the clay, making it sticky and difficult to handle.
Step 3: Rolling and Shaping
Use a rolling pin or press the clay evenly with your hands to achieve a uniform thickness. This step is crucial for creating consistent pieces, especially when designing flat or symmetrical objects.
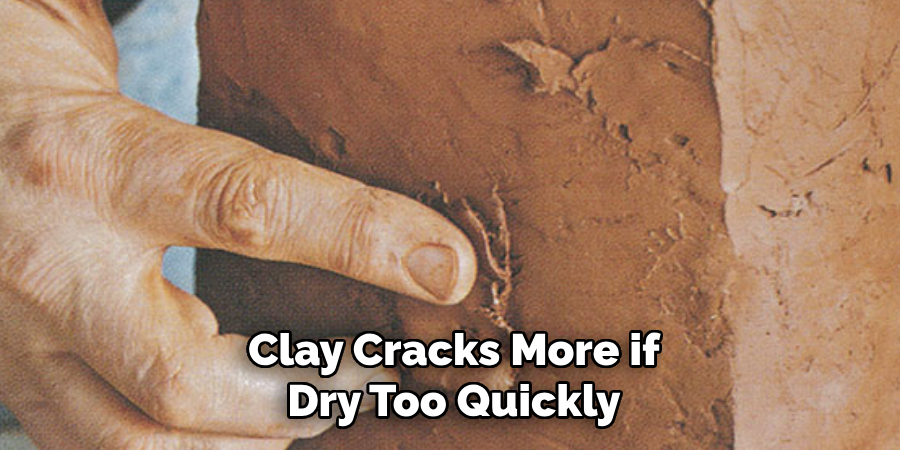
Step 4: Avoiding Cracks
Keep the clay moist as you work to prevent it from drying out too quickly and forming cracks. Mist the surface occasionally with water using a spray bottle, but be careful not to oversaturate it.
How to Use Terracotta Clay at Home Creating Terracotta Clay Projects
Terracotta clay offers a versatile medium for creating a wide range of craft projects, catering to all skill levels. Whether you are a beginner or an experienced artist, something is rewarding about sculpting and shaping this natural material into beautiful and functional pieces.
Beginner-Friendly Projects
For those new to working with terracotta clay, it’s best to start small and simple. Great beginner projects include clay coasters, small pots, and decorative plaques. These pieces allow you to practice rolling, shaping, and basic detailing techniques without becoming overly complex or time-consuming.
Intermediate Projects
Once you’ve mastered the fundamentals, you can progress to more intricate projects like clay candle holders, trinket dishes, and hanging ornaments. These require a bit more attention to symmetry and detail but remain approachable for hobbyists with some prior experience.

Advanced Projects
Seasoned artists can challenge themselves with larger or more complex designs, such as large planters, decorative vases, or sculptural decor pieces. These projects often involve advanced carving, structural integrity considerations, and refined finishing techniques.
Step-by-Step for a Simple Clay Dish
A simple clay dish is an excellent project for beginners to try.
- Roll out a flat circle of clay, ensuring even thickness throughout.
- Use a small bowl as a guide to shape your dish by pressing the clay gently around or into it.
- Smooth the edges and surface with a bit of water and a sponge for a polished look.
- Allow the dish to air dry or bake it, depending on the type of clay being used.
This process results in a functional, personalized piece showcasing your creative efforts.
Drying and Firing the Clay
Air-Dry Clay
Place your finished piece on a flat, well-ventilated surface for air-dry clay and allow it to dry naturally for 24-72 hours. To ensure even drying and prevent warping, rotate the piece occasionally. Be patient during this process, as rushing can lead to cracks or structural issues. Avoid placing the clay in direct sunlight or near heat sources, as these can cause rapid drying and create irregularities.
Kiln-Fired Clay
When working with kiln-fired clay, it is crucial to make sure your piece is arid before firing. Moisture in the clay can cause cracks or even explosions during firing. Place the dried clay in a kiln and fire it at the appropriate temperature, typically between 1,800°F and 2,100°F. Refer to the manufacturer’s guidelines for your specific type of clay to ensure proper firing. Different types of clay, such as earthenware, stoneware, and porcelain, have varying firing requirements.
Preventing Cracks
Be mindful of the drying speed to avoid cracks during the drying phase. Pieces that dry too quickly are more prone to stress and cracking. Slow the process by loosely covering your clay creation with plastic wrap or a damp cloth, especially in its initial drying stages. This technique helps the material dry evenly and reduces the risk of damage. Taking these precautions ensures your clay dish will be durable and showcase your creativity with a flawless finish.
Painting and Sealing the Clay
Painting and sealing your clay piece are vital steps to enhance its appearance and protect it for long-term use.
Choosing the Right Paint
Select a paint type that complements your design and intended use. Acrylic paint is ideal for achieving vibrant, bold colors, perfect for decorative pieces or items with intricate patterns. Watercolor paint can provide a soft, delicate finish for those aiming for a more understated, rustic effect. Remember, the choice of paint can dramatically influence the overall aesthetic of your piece.
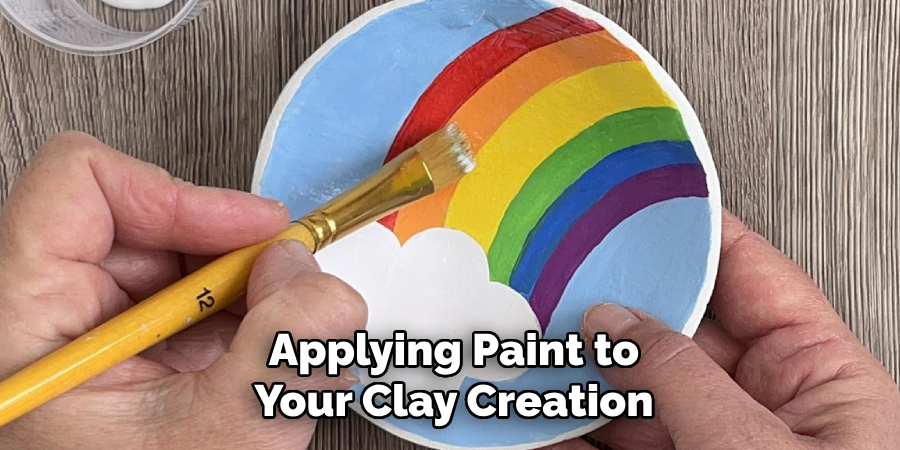
How to Apply Paint
When applying paint to your clay creation, working in thin layers is crucial. Thick layers can clog the clay’s pores and result in an uneven surface. Start with a light coat and allow it to dry completely before applying another. This step-by-step approach ensures a smooth finish while maintaining the texture and integrity of the clay.
Sealing for Longevity
Once your painting is complete, finish the project with a suitable sealant to protect it from wear and tear. Use a waterproof sealant to prevent damage for outdoor pieces or items exposed to moisture. Alternatively, wax-based sealants can create a natural, matte finish that preserves the handmade look. Sealing enhances durability and locks in your paintwork, ensuring your artistry shines for years to come.
Caring for Terracotta Clay Creations
Cleaning and Maintenance
To keep your terracotta creations pristine, wipe them with a soft, damp cloth to remove dust and dirt. Refrain from soaking the items in water, as terracotta is porous and prolonged exposure to moisture can weaken its structure. Always store your pieces in a dry environment to mitigate the risk of mold growth, which can occur in humid or damp conditions.
Fixing Minor Cracks
Over time, minor cracks may appear in your terracotta clay creations. These can be easily repaired using clay slip, which is made by mixing clay with water to achieve a paste-like consistency. Apply the slip to the cracks and smooth it out to ensure a seamless repair. Once dry, sand down any rough edges for an even finish. Regular maintenance will help your terracotta pieces retain their beauty and longevity.
Conclusion
Working with terracotta clay is a rewarding process that begins with choosing the right clay, then shaping, drying, and finishing your creation. Each step offers a chance to bring your artistic vision to life while learning valuable techniques. Whether you’re an experienced artisan or a beginner exploring how to use terracotta clay at home, the key is to experiment with different projects and approaches. Mistakes are essential to the creative process and often lead to unexpected inspiration. Enjoy the journey, and remember that every piece you craft is a testament to your imagination and diligence.
Toby Rede is a professional potter focused on creating functional and artistic ceramics. His work blends natural textures with modern forms, often inspired by sustainable gardening and outdoor environments. Toby’s pottery emphasizes both utility and beauty, reflecting his philosophy of intentional craftsmanship. On the blog, he shares insights on integrating handmade objects into everyday life.
Education
- Associate Degree in Ceramic Technology, Alfred University
Professional Focus
- Pottery creation with a focus on functionality and artistic expression
- Techniques exploring texture, glazing, and sustainable materials
Professional Accomplishments
- Work featured in regional art shows and garden exhibitions
- Collaborations with local craft fairs and home decor shops